AKTAKOM ATE-6020 is a wide range laser tachometer.
Features
- Laser light detecting source, long measuring range up to 2 meters, it is useful in the RPM measurement application where the machine would be a risk to the operator or close access is difficult or not possible
- Wide measuring range from 10 to 100,000RPM, 0.1RPM resolution for the measured value < 1000RPM
- Microprocessor based circuit, crystal time base, high precision with 0.05% accuracy
- High visible LCD display gives RPM reading exactly with no guessing or errors & saves battery energy
- Memory with recall function, the last value, max. value, min. value will be stored into the memory automatically
- The use of durable long lasting components, including a strong light weight ABS plastic housing, assures almost maintenance free performance for many years
Specifications
Display: 5 digits, 10mm (0.4") LCD with function annunciation
Measurement and range: 10 to 99,999RPM
Resolution:
- 0.1RPM (<1,000RPM)
- RPM (1,000RPM)
Accuracy: ±(0.05%+1digit)
Detecting distance: 50-2,000mm (2-78.7in) typically
Spec. of detecting distance are that under the size of reflecting tape is 10mm square and the measuring RPM value is 1,800RPM. The max. detecting distance may change under different environment, different reflecting tape or the measuring RPM beyond 1800RPM.
Laser light source:
- Less than 1mW
- Class 2 laser red diode. Wave length is 645nm approximately
Time base: Quartz crystal, 4.194MHz
Circuit: Exclusive one-chip of microcomputer LSI circuit
Operating Temp.: 0-50°C (32-122°F)
Operating Humidity: Less than 80%R.H.
Memory: Last/Max./Min. value
Battery: 4x1.5V AA (UM-3) battery
Power Consumption: Approx. DC 20mA
Dimensions: 2.8x7.5x1.5in/72x190x37mm
Weight: 0.55lb/250g including battery
Accessories
- Carrying case
- Reflecting tape marks (600mm / 23.6in)
- Operation manual
Measuring procedure
Apply a reflecting mark to the object being measured. Depress the "Measuring Button" (3-5, Fig. 1) & align the "Laser Light Beam" (3-2, Fig. 1) with the applied target. Verify that the "Monitor Indicator" (3-3, Fig. 1) lights when the target pass through the light beam. Release the "Measuring button" when the reading stabilizes (about 2 seconds).
CAUTION: LASER RADIATION – DO NOT STARE INTO LASER BEAM! Class II laser products.
Note: If the measured RPM values is very low, for example less than 50RPM, recommend to attach more "Reflecting Marks" to the object average. It will get the real RPM with high resolution, precisely & fast sampling time when divided the reading values by the no. of the "Marks".
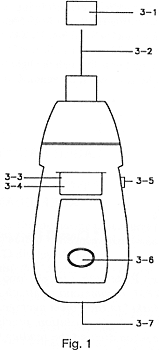 | 3-1 Reflecting Mark
3-2 Laser Light Beam
3-3 Monitor indicator
3-4 Display
3-5 Measuring Button
3-6 Memory Call Button
3-7 Battery Compartment |

